Are you planning to redirect your 404 page to your home page in WordPress?
Redirecting your 404 not found page to your site’s homepage can help minimize bounce rate and provides your visitors with a possibility to discover other benefitting content on your site.
In this blog post, we will explain to you how to redirect your 404 page to your home page in WordPress. Let’s have a look at this step-by-step article.
Table of Contents
Why Redirect Your 404 Page to Your WordPress Home Page?
If you don’t have the time to build a custom 404 page, you can alternatively redirect visitors to your home page can be an ideal solution.
While a user requests a page that isn’t available on your WordPress website, the WordPress will return them a 404 error page.
The majority of the users who land on the default 404 page will leave your website instantly. This, as a result, increase your overall bounce rate and adversely affect search engine rankings.
One method to ensure that your users remain engaged is to redirect them to another more relevant page. Few of the site owners take the shortcut and redirect users to the homepage.
Ideally, you need to redirect particular 404 error requests to a more suitable page.
With that being said, let’s take a look at two ways through which you can redirect your 404 page to your homepage as well as the custom pages in WordPress.
Suggested For Further Reading:
- How to Add a Blogroll in WordPress (Without Plugin)
- How to Add a Button in Your WordPress Header Menu
Method 1: Redirect All 404 Pages to Home Page in WordPress
This method utilizes a simple code snippet to redirect all 404 pages to the homepage. Alternatively, if you are planning to redirect individual 404 pages to more relevant pages, we will discuss that too in this article while we look onto the next method 2.
In this method, you have to add code to your WordPress files. If you have added the code to your WordPress files in past, then only proceed further. This method is not recommended for beginners.
First, you have to create a new file in your WordPress theme folder and name it 404.php. If your theme already has a 404.php file, you need to edit that file.
To edit that file, you will have to connect to your WordPress hosting account with an FTP client or their file manager tool.
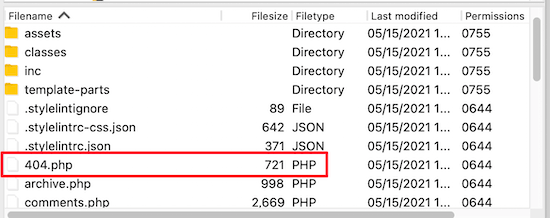
On connecting to your site, you can see the 404.php file in your WordPress themes folder.
You need to add the following code as the first line in your 404.php file:
<?php
header("HTTP/1.1 301 Moved Permanently");
header("Location: ".get_bloginfo('url'));
exit();
?>
Next, you have to save the 404.php file and reupload it to your theme directory utilizing FTP or your hosting control panel.
Now, whenever your site visitors don’t find a page you visited, instead of showing a 404 page, they will be redirected to your WordPress home page.
Method 2: Use AIOSEO to Set up Custom 404 Page Redirects in WordPress
The ideal and the most SEO friendly method of handling and managing 404 errors is to redirect them to the most relevant page instead of simply a homepage.
All in One SEO plugin is used to redirect 404 page. And, it is the best SEO plugin for WordPress utilized by more than 2 million websites.
Their Redirects feature can trace all 404 page errors and allows you to set up smart 404 page redirects in WordPress.
First and the foremost thing is to install and activate the AIOSEO. For additional details, you can see our guide on how to install a WordPress plugin.
Note: To redirect your 404 page, you need to have the pro version of the plugin.
On activating the plugin, navigate to All in one SEO>> Redirects. In case you haven’t yet set up redirects, you need to click the ‘Activate Redirects’ button.
After that, you have to click on the ‘Settings’ menu item and activate the 404 logs.
Next, scroll till you observe the ‘Logs’ section and then click on the ‘404 Logs’ toggle, so it turns blue.
The 404 logs are a record of URLs that explains that your site visitors have made an attempt to visit the pages that are no longer available.
You can decide how long you need the plugin to record your logs by picking the time period from the drop-down menu.
Ensure that you click ‘Save Changes’ before heading forward.
Then, you need to click on the ‘404 Logs’ menu option to see the last accessed 404 page.
Note: It takes up to 24 hours to see more valuable insights there.
The ‘URL’ column will display you with 404 page the user tried to visit. You just have to click the ‘Add Redirect’ link in the ‘Redirect’ column.
A drop down menu will be created where you can add your redirect information.
For the optimal results, you have to enter the most suitable page to the original query in the ‘Target URL’ box and then click on ‘Add Redirect’.
Note: It isn’t an ideal solution to redirect your 404 page to your home page forever. It’s just a temporary solution.
We hope this article helped you understand how to redirect your 404 page in WordPress.
Additionally, you can look for Managed WordPress Hosting for lightning-fast speed with High-speed SSD, 99.9% uptime & 24/7 managed live support.